
Before discussing how a smart contract can be deployed on the Ethereum platform, you must understand what smart contracts are and how they are written.
A smart contract is a program that resides at a specific address inside a blockchain, and the functions inside the smart contract determine how it should behave. It can store, send, and receive money as cryptocurrency.
Smart contract code is written in Solidity, a programming language specifically designed for Ethereum, and its code structure is similar to a Class of an Object Oriented Programming language. Here’s an example of how a smart contract for a vending machine can be written in Solidity.
contract VendingMachine {

    address public owner;
    uint public sodaPopPrice = 20;

    constructor() {
        owner = msg.sender;
    }

    function dispenseSodaPop(uint count) public payable {
        if(msg.value >= count * sodaPopPrice ether){
           print("Dispense Soda Pop")
        }
    }
}
As I’ve mentioned, a contract code looks like a Class from a programming language like Java. Anyone with enough ether in their account can call the dispenseSodaPop() function to buy a soda pop. Smart contracts can replace mediators in numerous businesses.
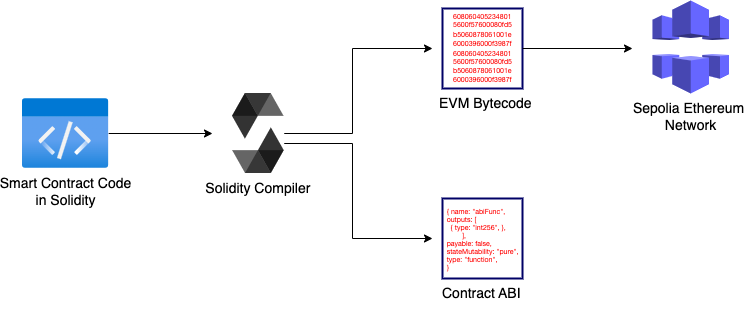
Once a smart contract code is written, we need to compile it into bytecode and ABI (Application Binary Interface) using the Solidity compiler to execute it on the Ethereum Virtual Machine (EVM). Let us understand what EVM, EVM bytecode, and ABI are.
Ethereum Virtual Machine (EVM): EVM is a virtual machine that executes smart contracts on the Ethereum blockchain. It is a vital component of the Ethereum network, as it is accountable for executing the bytecode of smart contracts in a decentralized manner.
EVM Bytecode: EVM bytecode is a set of low-level programming language instructions that are machine-readable and executed by the Ethereum Virtual Machine (EVM). When a smart contract is compiled, its high-level programming language code (such as code written in Solidity) is converted into EVM bytecode, which can be executed by the EVM on the Ethereum blockchain.
Contract ABI: The contract ABI is generated when a smart contract is compiled. It acts as a bridge for the developers to interact with a smart contract using tools like the Ethereum Web3.js library or through Ethereum-compatible wallets. It contains a list of all the functions that can be called on the contract, along with their input and output parameters.
To deploy a smart contract, start by compiling the code into bytecode using a Solidity compiler. Next, create an Ethereum account and fund it with ETH. Finally, utilize tools such as Truffle, Hardhat, or Remix to deploy the smart contract. The upcoming section will guide you through each step.
Custom Node.js Project to Deploy Smart Contract
Pre-requisites
- Node.js and npm are installed in your system.
- Ethereum account funded with ETH. You can make use of the blog post to create one. https://blog.ceegees.in/domain/blockchain/ethereum-accounts/
- Infura Url for the Sepolia network. Go to the below link to create an API key to get your Infura Url for the Sepolia network.
https://app.infura.io/dashboard
Folder structure
.
├── Messages.sol
├── compile.js
├── deploy.js
└── package.json
Set-up
Create a new folder and initialize a node.js project by creating a package.json file by entering the following command in CLI.
$ npm init -yInstall ganache,solc and web3 npm packages.
$ npm install ganache solc web3Code for deploying a smart contract
1. Code for defining a smart contract
pragma solidity ^0.8.9;

contract Messages {
    string public message;

    constructor(string memory initialMessage) {
        message = initialMessage;
    }

    function setNewMessage(string memory newMessage) public {
        message = newMessage;
    }
}Let’s go through the code step by step:
Line 1: Specifies the compiler version to be used for the compilation of the smart contract code.
Line 3: Defines a new contract named Messages. A contract in Solidity is similar to a class in object-oriented programming, and it contains state variables, functions, and events that are used to control access to the contract’s functions.
Line 4: Declares an instance variable called message. The type of variable is a string that can store a string value. The public keyword is the visibility modifier. It means that the variable can be accessed and read by anyone, both from inside and outside the smart contract.
Line 6-7: Defines a constructor function. The constructor function is executed only once when the smart contract is first deployed to the blockchain network. In this case, the value of the initialMessage parameter is assigned to the message state variable.
Line 10: Defines a function that accepts a variable called newMessage which is of the type string. The visibility modifier of this parameter is public. The memory keyword means that the parameter is stored in memory instead of storage. When this function is called, the message variable is updated with the value of newMessage variable.
Note: When a variable is declared aspublicin a Solidity smart contract, a getter function is automatically generated by the compiler. The getter function has the same name as the variable and returns the value of the variable when called. In this case, the automatically generated getter function for themessagewould be:
    function getMessage() public view returns (string memory) {
        return message;
    }
2. Code for compiling the smart contract
const path = require("path");
const fs = require("fs");
const solc = require("solc");

const messagesPath = path.resolve(__dirname, "Messages.sol");
const source = fs.readFileSync(messagesPath, "utf8");

const input = {
  language: "Solidity",
  sources: {
    "Messages.sol": {
      content: source,
    },
  },
  settings: {
    outputSelection: {
      "*": {
        "*": ["*"],
      },
    },
  },
};

module.exports = JSON.parse(solc.compile(JSON.stringify(input))).contracts[
  "Messages.sol"
].Messages;
Let’s go through the code step by step:
Line 1: Imports the path module using the require() function. The path module provides several methods for working with file paths.
Line 2: Imports the fs module using the require() function.The fs module provides functions for working with files and directories, including reading and writing files, creating and deleting directories, and more.
Line 3: Imports the solc package using the require() function. The solc package provides a way to compile Solidity code into bytecode.
Line 5: Combines __dirname and Messages.sol into an absolute path in string format using the path.resolve() method. The __dirname represents the absolute path of the directory containing the currently executing JavaScript file.
Line 6: Reads the contents of the file messagePath, returns the contents of the file as utf8 encoded string and stores it in a variable called source.
Line 8-22: The input object is created to contain the necessary information that will be provided to the Solidity compiler. It contains the following properties:
- language: It specifies the programming language used in the source code. In this case, it is set to
Solidity. - sources: This is an object containing the source code to be compiled. Inside the object, the key is set to the file name, and the value is an object with a content property containing the actual Solidity code. In our case, the key is set to the
Message.solfile, and the value is set to thesourcevariable. - settings: This is also an object containing compiler settings. In our case, we set the output selection to include all output for all contracts.
Line 24-26: Passes the input object to solc.compile() method, which compiles the Solidity source code and returns an object containing detailed information about the compiled contracts, including their bytecode, ABI, and metadata. In our case, we export Messages contract object, which is extracted from the Messages object using the filename key and contract name.
3. Code for deploying the smart contract
const HDWalletProvider = require("@truffle/hdwallet-provider");
const Web3 = require("web3");

const { abi, evm } = require("./compile");

provider = new HDWalletProvider(
  "REPLACE_WITH_YOUR_MNEMONIC",
  "REPLACE_WITH_YOUR_INFURA_URL"
);

const web3 = new Web3(provider);

const deploy = async () => {
  const accounts = await web3.eth.getAccounts();

  console.log("Attempting to deploy from account", accounts[0]);

  const result = await new web3.eth.Contract(abi)
    .deploy({
      data: evm.bytecode.object,
      arguments: ["Hey, this is the initial message"],
    })
    .send({ gas: "1000000", from: accounts[0] });

  console.log("Contract deployed to", result.options.address);
  provider.engine.stop();
};
deploy();
Let’s go through the code step by step:
Line 1: Imports the @truffle/hdwallet-provider module using the require() function. It is used to sign transactions with a mnemonic and deploy them to a network.
Line 2: Imports the web3 module using the require() function.
Line 4: Imports abi and evm are imported from the ./compile.js file.
Line 6-9: A new instance of HDWalletProvider is created, which accepts two arguments: the mnemonic phrase and the Infura URL.
- Mnemonic phrase: It is a string of words that allows the provider to sign transactions on behalf of the account. Here’s what a mnemonic phrase looks like:
water rest grunt eraser missile paper zoo fade animal real warrior wedding - Infura URL: It is the endpoint of the Ethereum network to which the contract will be deployed. Here’s what a mnemonic phrase looks like:
https://sepolia.infura.io/v3/your-api-key
Line 11: A new instance of Web3 is created which accepts the provider object. This connects the web3 library to the Ethereum network specified by the provider.
Line 13: Defines an asynchronous function deploy.
Line 14: The web3.eth.getAccounts() method is called to retrieve the accounts associated to our credentials through the HDWalletProvider instance variable provider. We’ll be using the first account (accounts[0]) to deploy the contract.
Line 18-22: Creates an instance of the contract object using web3.eth.Contract() constructor function. It accepts the contracts ABI (abi). The contract is then prepared to be deployed using the deploy() method of the contract’s instance. The parameters specified are:
- data: It specifies the bytecode (
evm.bytecode.object) of the smart contract to be deployed. - arguments: It specifies the arguments on the constructor in our smart contract. In our case, we have only one called
initialMessage. In the code, [“Hey, this is the initial message“] is provided as the argument, which means the value ofinitialMessagein our smart contract will beHey, this is the initial message.
Note: Thedeploymethod prepares the contract deployment transaction but doesn’t actually execute it on the blockchain.
Line 23: Calls the send() method by chaining it to the deploy() method to send the deployment transaction and deploy the contract.
Line 25: Logs the deployed smart contract’s address to the console.
Line 26: Stops the HDWalletProvider’s engine by calling provider.engine.stop() method.
Line 28: The deploy() function is called to initiate the deployment process.
Output
Let us execute the deploy.js file to deploy the smart contract by running the following command in the terminal.
$ node deploy.js

> Attempting to deploy from account 0x1b1e84e68dFeb9Dc062Da8bD458a0d32BC01417b
  Contract deployed to 0xe86AD56E698D9962B5d2978fD29d494eFa8890F6
Let’s verify the contract deployment by navigating to sepolia.etherscan.io.
The sepolia.etherscan.io is a popular and widely used blockchain explorer and analytics platform specifically designed for the Sepolia Ethereum blockchain. It provides users with the ability to explore and search for various information related to Ethereum transactions, addresses, smart contracts, and network statistics in the Sepolia test network.
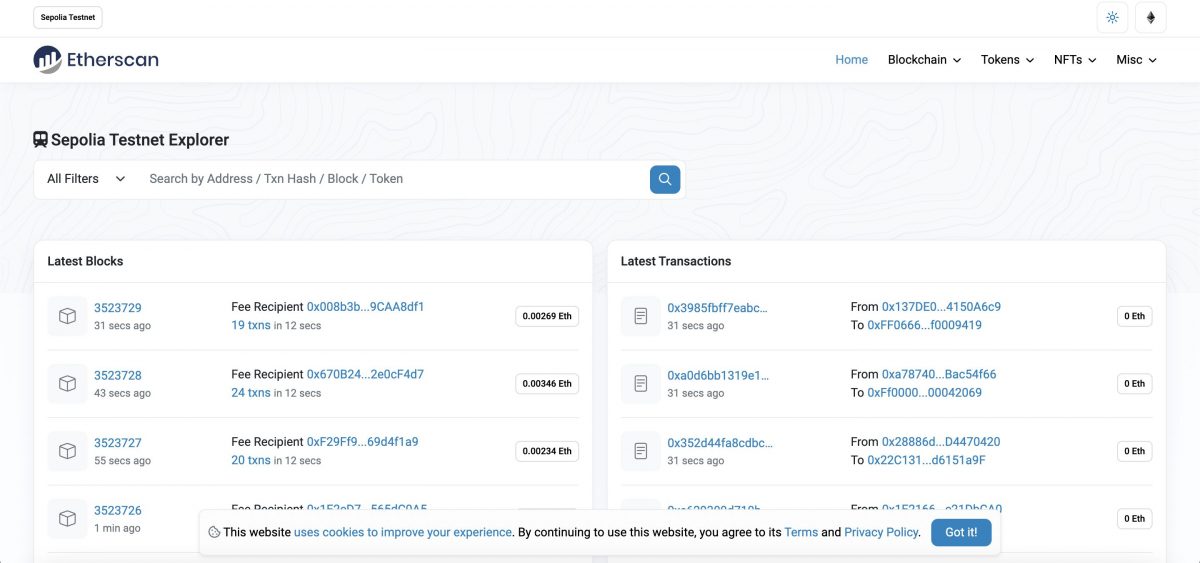
Copy the contract address and paste it into the search bar and click on the search icon.
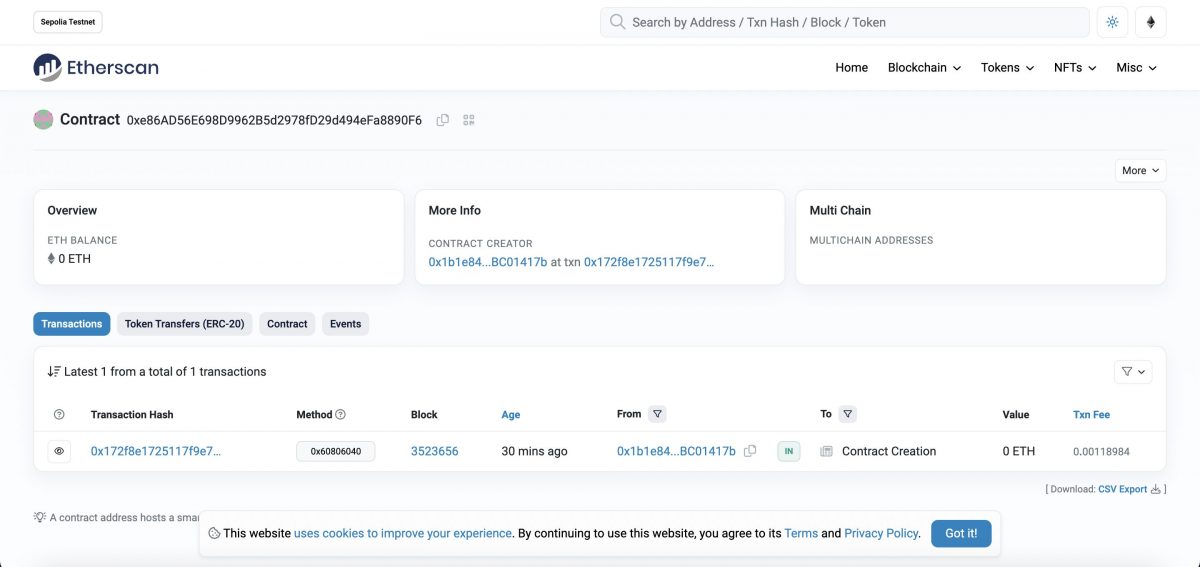
Above, you can find the details of our recently deployed contract, we’ve verified our contract’s deployment. Congrats 🎉
Source Code
Github: https://github.com/cod3kid/blog/tree/main/deploy-smart-contract